DOCUMENTARY REGISTRY WORKING DESKTOP
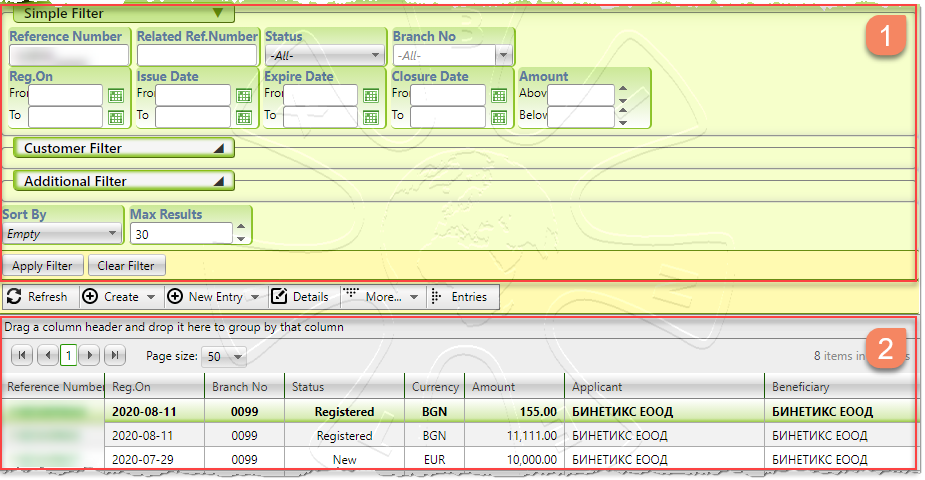
The workspace of the Documentary Registry in PTM’21 is simplified compared to the previous versions and is organized in two main panels:
1)Filtering Panel - contains fields on which entries in the Registry can be filtered by different criteria;
2)Panel to work with table data - contains records with detailed information organized in columns for the visible Documentary Records.
FILTERING PANEL - You can select one or more filtering criteria and apply them to the registered Documentary Records. In the lower left corner of the panel there are two buttons:
i.Apply filter - pressing the button causes immediate filtering of table data, combining the criteria logically with "AND", etc. their values are always applied together and combined on the Registry;
ii.Clear filter - pressing the button causes the filter fields to be cleared to initial values. This will also remove the last applied filter from the panel data table. As a result of applying the button, the screen prepares for another filter and the table data remains unfiltered (all Records are displayed).
Quick filter - explanations on fields usage:
•In PTM'21 The filter fields are optimized for the respective payment channel, and in most of the fields you can search and filter in a time or numerical range from-to.
•The "Registered on" field reflects the time a new Documentary record was created. This moment can occur in different circumstances, but normally when creating a Record manually, the current date of the server is taken.
•The "Date of issue" field is operational and is entered manually by the banking expert when processing the Record.
•The field "Expiration date" reflects the moment of the expected completion of work on the Record, as per documents. It is entered manually upon processing the Record.
•The field "Closing date" is filled-in automatically by the System when a Record is closed administratively or by completing a respective “Order for closing”.
Additional filter – in this part of the screen you can add and logically combine many additional fields from the database to filter. Below are shown some of the more commonly used fields:
▪Approved on
▪Approved by
▪User No
▪Branch No
▪Send Amount
▪Receive Amount
▪Fee Amount
▪Accounted Amount
▪Paid Amount
▪Rest Amount (Payment balance)
▪Utilized Amount
DATA MANAGEMENT PANEL - The panel contains the following buttons:
i.Refresh - pressing the button causes the Records table to be reloaded. Note that when the screen is initially loaded, the panel data table is blank. You must implicitly click the "Refresh" button to preview your records. Another option available is to directly apply a filter by clicking on the "Apply filter" button;
ii.Create - serves to manually create new Documentary Record;
iii.New Order – new button in PTM’21 which enables the clerks and bank experts to directly create Orders in relation to already selected Record without having to enter and navigate further in the Documentary Record;
iv.Details - pressing the button causes a review and change of data and documents of a Documentary Record. Note that this button is only available if you have selected a Documentary Record from the table;
v.Orders - pressing the button provides access to screen Management of all Documentary Orders to Documentary Records by chosen payment channel, for example all Records for LOC export;
vi.More - pressing the button provides access to a drop-down menu with additional options and functionalities such as export to Excel of table data from the Document Registry.
HOW TO VISUALLY REORGANIZE DATA PANEL:
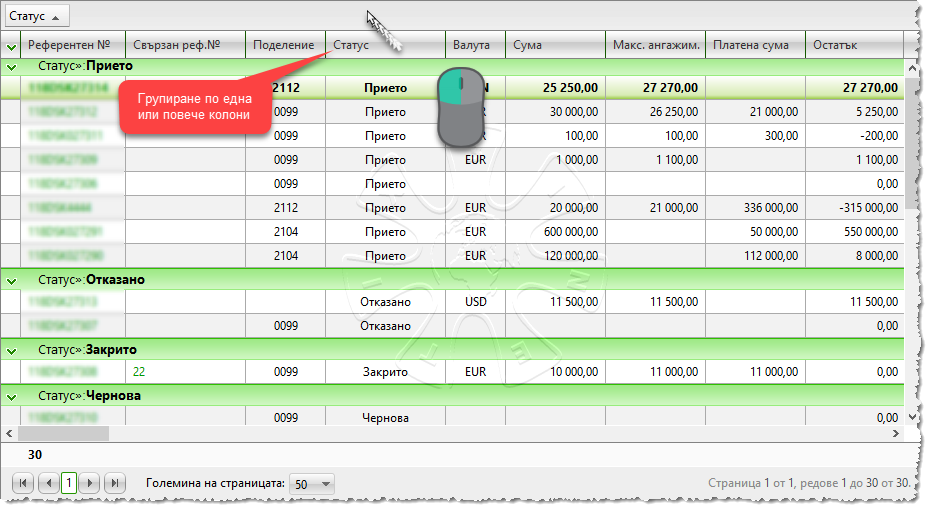
The Data panel contains listings of Documentary Records from selected Documentary Registry.
Table data are organized in rows and columns, and the user has the options to:
✓temporarily to filter data on a selected column - to activate this feature, you need to click the title of the desired column with the mouse. Clicking on a previously filtered column will cause the data to be rearranged in reverse order;
✓temporary reorganization of the columns - the columns in the table can be reorganized by moving it in front of each other with the mouse;
✓temporarily to group the data by one or more columns - to activate this feature, simply hold the left mouse button on the head title of the desired column and move it to the bar above the table. On the above example you can see grouping of the Documentary Records by their working status;
✓ temporarily to sort by grouped data - the user can further sort the data by groups, by clicking on the column headings in the bar above the table.
The user has the option to double-click on a selected row in the table to review and change of a Documentary Record.